Welcome to my top five list of Photoshop Retouching Mistakes. Aimed at the beginner retoucher (if you’ve been around a while you know all this) I’ve compiled five retouching crimes I see frequently.
I’m not going to go into massive depth with step by step tutorials, as I don’t believe in them. My apologies for quickly glossing over techniques I don’t have the space to go into in depth here, if as a beginner you’ve never used luminosity masking for example, consult Adobe’s help file, then use your imagination to play with your new selections, using various fills and adjustment layers. If any technique is new to you, go straight to that help file and then experiment before looking at any top ten Google tutorials. The single worst way to learn how to retouch is by looking through the millions of tutorials search engines throw up, because they’re simply saturated with ‘quick-fix’ ten step promises of perfection in under ten minutes. The truth is, perfection isn’t that simple, and neither is good retouching. So if you decided to add something to your Photoshop skill set today, make it what you take from this article.
Quick-fix skin
If you’re starting out and learning as I did eight years ago from online ten step tutorials you’re going to have to unlearn a lot of bad habits. I did it myself back then and the internet has always had a preference for quick and easy. If you’re still reading and haven’t left to find a five minute Gaussian Blur tutorial yet, we’re on the same page, thanks for sticking with it 😉
The single most involved and controlled way to get professional skin results is dodging and burning pixels and groups of pixels, and it’s going to take you hours rather than minutes. That’s the reality of high end beauty retouching, and if you’re aiming towards magazine editorials and advertisements you’re going to have to start now. In portrait retouching you needn’t be so involved but bear in mind that in all cases, one click blur methods yield unprofessional results (though occasionally, employed subtly the technique can have some small benefit on web-sized snapshots with no pore detail).
Below I’ve provided a quick example on a small section of skin, you can see in close detail that the Gaussian Blur method leaves lifeless, plastic skin with no character. In the third image, I’ve used two curves adjustment layers to dodge and burn individual pixel groups, and all character and detail remains; sharp perfect skin without the blur.
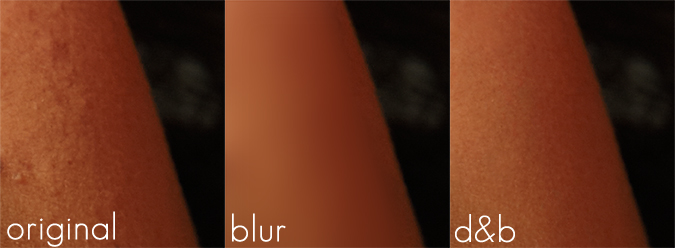 You can achieve this by creating a New Layer set to Overlay and filled with 50% grey, but you’ll get a lot more control by starting two Curves adjustment layers, pulling up some lighter midtones in one and inverting the mask, then darker in the other and invert the mask again. You can then paint white into your masks (or black and white onto your grey layer).
Beautifying a human subject isn’t always right
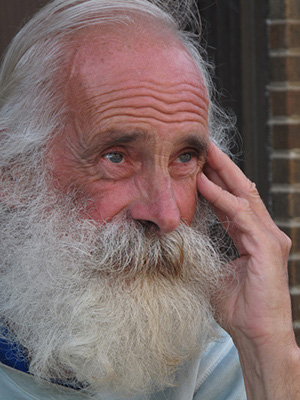 There are an astonishing number of hobbyists and even more alarmingly people who take money from clients who if asked what retouching was, would tell you it was about removing blemishes and making people skinnier. Hardly surprising that these retouchers got the wrong idea when retouching only hits the media when it’s overdone. I found a recent example on photoshopdisasters.blogspot.com where a retoucher (who charges well in excess of $100 US per hour) had horrifically gaussian blurred an image of an older lady, so this header had to make this list.
In the image below I purposefully followed the examples of highly Google-ranked Photoshop retouching tutorials I’ve found on the internet. I spent no more than two or or three minutes, smoothed the skin with some gaussian blur, used clone and patch to remove all those wrinkles, popped in a quick inverted highpass and used selection based curves to sexy up those baby blues. But just hang on a moment…
 This is an old man we’re talking about, he might be very proud of those wrinkles; they tell of life experience, and more importantly perhaps, don’t forget we’re not just dealing with a human subject here, but a photograph. How have we changed the story of the image?
Well we’re looking at a candid portrait shot in this case, start thinking of a photograph as a piece of art. Ask yourself what story it tells, what its purpose is. The man’s face is lined with decades of wrinkles, he looks concerned. Imagine his story, what is he looking at, why does he look so pensive?
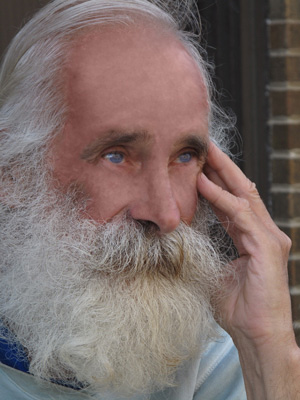
Now look at the ‘retouch’. What story does it tell? It’s says ‘Hi I’m Frank, I look good for my age because I use Oil of Olay, twice a day.’ Right. Not quite the original intent, and as such, a complete failure.
Let’s look at how we can improve the photograph by enhancing its qualities instead of eliminating them.
Those deep furrows and shadows are fantastic, let’s accentuate them.
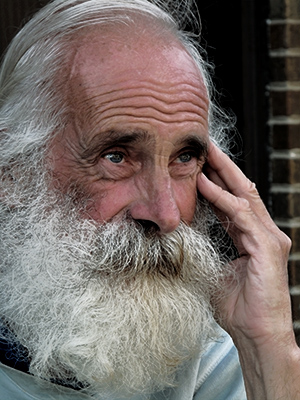 Ironically, the term over-Photoshopped has been applied to images such as the one above. This, as we’ve seen is the exact opposite of the truth, it took three minutes to make that photograph look ‘over-Photoshopped.’ Good post processing takes time. In this third image, I used four luminosity mask-based fills on separate layers to darken those shadows, and tinkered with a selective colour adjustment to darken the blacks still further and bring a more vivid white to the lighter hairs. On a full job I’d paint in further shadow and highlights on a new Overlay layer filled with 50% grey, but this will do for demonstration.
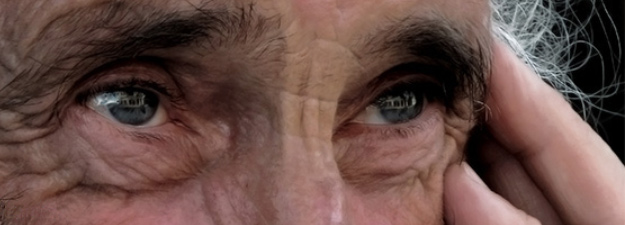
In this way we’ve assessed the mood and key aspects of the photograph and enhanced them. Below are detail shots of all three, the Gaussian Blur ‘quick fix’ methods really show their failings in high res. The only ‘airbrushing’ necessary was to remove a couple of distracting hairs, the subject remains as the photographer intended. Always bear in mind that a wrinkle or blemish isn’t necessarily a bad thing.
Click here for a high-res sample of the three images.
A freckle or birthmark is not a necessarily a blemish
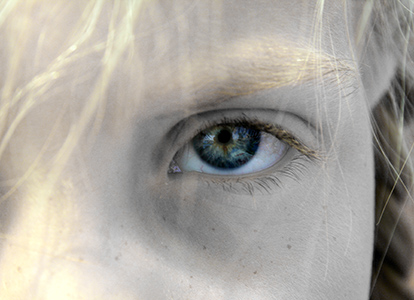 Continuing from the previous theme, this is often a difficult one to consider, but let’s deconstruct the main thinking behind the decision to remove or retain character marks. In portrait photography, or even a snapshot, the image is representative of that person, it is their character. Now in some cases, you might be asked to remove a mole or freckle, but unless asked, don’t pass on your arbitrary opinion that your client would look better without that beauty spot. If they prove a distraction, you can soften marks subtly, but obliterating them with the clone tool has the potential to find you angry clients.
Beauty and fashion photography are different altogether. Let’s imagine the beauty image is one to be used in an advertising campaign. Any unevenness in skin tones need to be addressed (selection-based curves, selective colour adjustments), and of course any distracting redness and blemishes removed. However if the model has freckles, think of your photographer again. It’s more than highly likely that he or she chose that model because of that feature, not in spite of it. If in doubt, call or email them to ask first, and always use the clone stamp on its own layer, never directly on your background, that way any changes are easily recoverable.
In the fashion shot, where your focus is the clothes, the model’s skin character is secondary to the clothes looking their best. This doesn’t mean of course that you shouldn’t do a professional job with the skin, it just means that you can be the judge of which marks and blemishes enhance the image, and which need to go. This means that again, a model’s character marks can be removed or softened if distracting, making sure freckles and beauty marks are balanced or fitting to the composition. Read fashion magazines and look through the editorials, you’ll see that not all freckles and beauty marks are removed.
Retouch the whole image
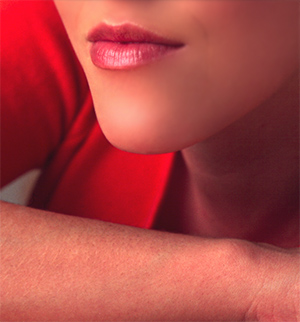 It sounds obvious, but a very common beginner mistake is to concentrate entirely on one area, often the face. Always make sure you spend enough time to catch distracting flyaway hairs, dust spots and marks on backgrounds, and never neglect the rest of the skin and clothes. This looks particularly horrendous when coupled with skin blur techniques, as the whole image has a uniform type of noise and level of sharpness with an independent blob of face in the middle of it.
See the example posted left, the face has been ‘retouched’ (blurred) but notice the disparity between the texture of the face and arm. Remember to look at a photograph as a full image, and never forget to pay attention to the image as a whole. It’s your place to make the photograph as effective as possible, most tutorials deal with making faces and eyes pretty in under 5 minutes, scrap all that knowledge and look to the bigger picture. It’s the key to breaking out from the ranks of $10 QUIK PHOTO FIX 4 U cowboys and into your profession as a retoucher and digital artist.
Don’t rely on tutorials
It doesn’t sound nearly as glamourous as ‘Perfect Photographs in under 5 minutes’, but those techniques don’t exist, the truth is Adobe’s help file is the only tutorial you need at this point. Boring right? If you still search for tutorials for every technique, you’re teaching yourself everyone else’s bad habits and there’s a point where you need to nail down the basics. I found this advice the most helpful I’ve ever received, and it came from a rather grumpy old-school pre-Photoshop retoucher on a forum some years ago. Learn to master your tools and you’ll never need a tutorial, not on skin, eyes, clothing, backgrounds, compositing, none of it. While you’re mastering those tools, take a look at the work of those retouchers and digital artists whose work has always inspired you. I’d be willing to bet that the person you never thought you’d be as good as studied art and applied their knowledge to the digital tool set; the reason they’re better than any tutorial you’ve ever seen is because they don’t use them.
If you want genuinely professional results you won’t get them with Gaussian Blur or making selections with the Magic Wand (if you don’t use the Pen Tool, learn it, you’ll probably hate it as much as I did but it’s worth it). Spend your time taking a look at retouching work by people who are where you aspire to be, perhaps in magazines or advertising. When you know what all your tools do (oh and learn all the keyboard shortcuts and force yourself to use them) you’ll find yourself deconstructing their work and knowing exactly how to achieve similar results.
A few tips and resources
If you’re just starting out, stock xchng (recently bought by Getty) isn’t a terrible starting point for stock, and better than taking copyright protected images from Google searches that you can’t use in your portfolio. Politely ask photographers on forums if you might practice using their images. Never publish an image as your work unless the copyright holder knows about it (this often excludes images distributed freely but it’s still nice to let them know). I picked the Numero gallery as an example of work because it has a pretty broad range, fashion, beauty, product, even architecture, but take a look around for respected publications in your field and don’t forget to study how they look in print. Learning how to prepare a file for print will also serve you well.
If you’re looking for other retouchers to bounce ideas around with, try RetouchPro. The webinars are pretty good value, so keep an eye out for the ones in your field, and be prepared to completely change your workflow if someone more knowledgeable provides you with a way of making your images a few pixels more perfect than they were. It all counts and it’s never good enough if there’s a better way.
Thanks for reading this far, I hope it’s of help to someone, I know each piece of advice has been invaluable to me at some point along the way. Even for those of you who know all this, my thanks for reading and please do leave a comment below for beginners to read. It all helps and I’m sure together we can fight the quick-fix photo disasters and help the next generation of retouchers avoid the mistakes I (and no doubt many others) admittedly made years ago. If you have any further mistakes and solutions that need a mention, please do add them.
Remember to respect the photograph, the photographer’s intent, develop an eye for the art and utilise the tools to implement your learning. It’ll serve you far better than any tutorial. It just isn’t quick 🙂
Danny
You are right on the mark with your tips. I’ve been a retoucher for over 20 years and those I’ve worked with cannot seem to understand the right and wrong way of retouching. They want to do it the easiest and quickest way and then brag about their great work. It’s a shame that those that use retouchers can’t see the bad work for what it is.
I have one question, do you ever use on-line retouchers? I do freelance retouching now and would like to do work for a quality company or client. I would like to send you my portfolio if that is possible. Thanks for letting me make a comment!
Hi Cathy thanks for your post, although it’s quite an odd question! I am a freelance retoucher and you’re posting on my online portfolio site 😀
Thanks for this tutorial, I think am finally saved, am in category of people searching online tut for all my photoshop skills, and thats how I got here. Thankfully I don’t have to spend too much years. You saved me. Thanks once again your honest and sincere advice and tution are a life saver. Am starting afresh. Pls keep it coming, someone like me needs your true leadership.
Wow, thanks a lot. I was looking for something like this for a while now.
Comfortabl y, the article is in reality the greatest on this noteworthy topic. I concur with your conclusions and will thirstily look forward to your upcoming updates. Saying thanks will not just be enough, for the extraordinary lucidity in your writing. I will immediately grab your rss feed to stay privy of any updates. Genuine work and much success in your business efforts!
I had to let that last spam comment through after removing the name and url, it made my day.
If anyone else wants to ‘immediately grab my RSS feed’ feel free, the icon’s at the top right 🙂
Thank you very much for your advices. Great work.
The advice you gave is really good and are from professional point of view.I really like the post but i think u should also post some little basic video tutorials(like pen tool,d&b) and examples.That way it can really help us to understand better what you want to convey.
Hi Ricky, I’m currently putting together a list of topics and the bare bones of articles, I think if I were starting out I’d value a single place where I could find exactly what I was looking for on the subject of retouching.
I have a Youtube account ready to go also, and over the summer I’m going to start building the site as a more complete resource. Keep an eye out 😉
This has been really useful information, i am still learning, and picked up some good tips!
thanks
really useful information,
Hi! great work! I am just starting out and I ABHOR when people use gaussian blur or surface blur and just leave it, haha, but seriously, you are amazing at your retouching!
Your work is great. Thanks for the tips. Gaussian blur really does ruin images!
I realize that I’m one of those “Gaussian Blur”-technique using newbies and I loved this article. You are right in that learning the proper techniques in the very beginning is the best route; it keeps you from de-programming bad habits and having to relearn the correct ones all over again. The majority of google searches (and photoshop technique books I’ve purchased) endorse the Gaussian Blur method but I think it’s done moreso for time-saving benefits. I’ve also found that WHAT you search yields those exact results. I’ve been youtubing “high-end fashion photo retouching” lately (as opposed to just “blemish removal/skin evening”) and am finding some great videos that don’t even TOUCH the blur tools.
I value your experience and your sharing it with us.
-Young Jedi Master
Thank you very much for writing and posting this great and helpful article.I am a student of graphic design and it’s a great help to me to read tips like this!
Hi Danny,
I was trying to find tutorials of the photoshop tools, just to get rid of the rusty on my skills after a happy motherhood. I’m retouching pics for 7 years and this world changes so fast that u get rusty same fast or more 😀
I became so sad because I only find that kind of tutorials u talk about, “how to … in 5 minutes”, “become a master of retouching” bla bla… But finally I found psd.tutsplus.com. They have a bit of everything, but mostly worthed videos to learn photoshop and their tools. I love the basix series.
Thankfully I found ur website by casuality and thanks god I did it 😀
I’m glad to find people who believe that retouching is a kind of art that takes a lot of time for to do it well.
I think this profession has become like graphic design (I’m a GD and amateur retoucher) a time ago: everybody started to have access to computers and freehand, and photoshop, and after a 3 months course, they called theirselves graphic designer…
Now they watch some video tutorials, they make a few fast retouches of their family or friends, and they call theirselves photo retouchers…
I started to deal with photoshop 2.0.1 and here I’m, telling always that I still, after all this years, I don’t know photoshop 100%, but oh friend, you went o a 3 months intensive course and U know it as the palm of your hand, yes, of course…
Anyway… Thanks for telling to the world how things really are in the world of retouching and thanks again for take some of the “gods” down to earth 😀
Hi Daniel,
This article reminds me my early days with Photoshop, because I also made these kinds of mistakes in that time. Really you have greatly pointed out the facts, that newbie Photoshop users often do.