In the Dodge and Burn tutorial I covered the basics of D&B, using the curves and soft light methods, pixel level and carving. In this article I’ll cover a few extra tips that’ll help your eye make the right decisions and to avoid any unwanted colour shifts.
Enhancing the Problem (temporarily)
There are a couple of good ways to temporarily alter the image to show up the problem areas and help you dodge and burn what you otherwise might miss. The first is simple, add a Hue/Saturation adjustment layer and pull the saturation slider to -100. After all, we’re dealing solely with luminosity, colour can be an unwanted distraction.
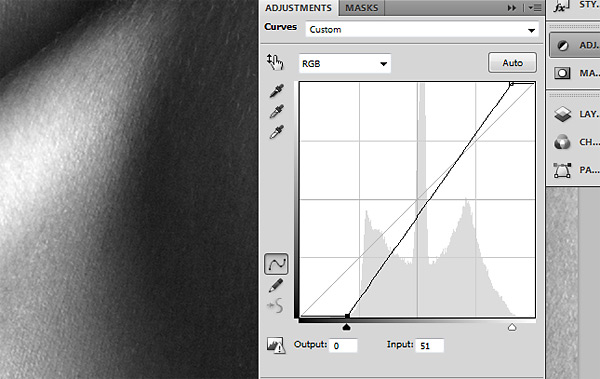
Secondly, you can use a curve to increase contrast to the areas you’re working on. The steepest part of a curve is the area of highest contrast, and we can manipulate this to help us work on problem areas. With this sample image I’m lucky enough to be able to significantly increase the steepness of the curve without losing much detail at either end;

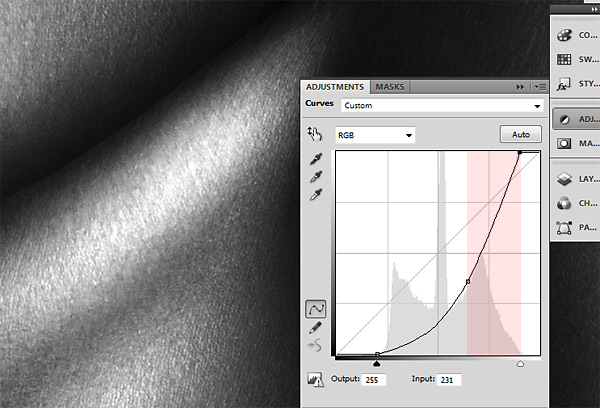
This brings out a lot of detail that might otherwise be difficult to spot. To increase contrast in a specific area, such as the highlights in this collarbone, shift the curve so that the steepest part of the curve lies in the lightest part of the histogram;

Be aware that by doing this you’re decreasing contrast in the shadows and in danger of plugging the blacks, so you may need to steepen the curve there later to check you haven’t missed anything.
Group your desaturation and contrast curve layers together and simply switch them off when you’re done.
Combating Colour Shifts
The problem with dodge and burn is that areas of shadow are more saturated than midtones, and a lot more saturated than highlights. As we’re dealing solely with luminosity, those hues won’t change, meaning an area you’ve significantly lightened can appear oversaturated and a darkened highlight can look ashy and dull.
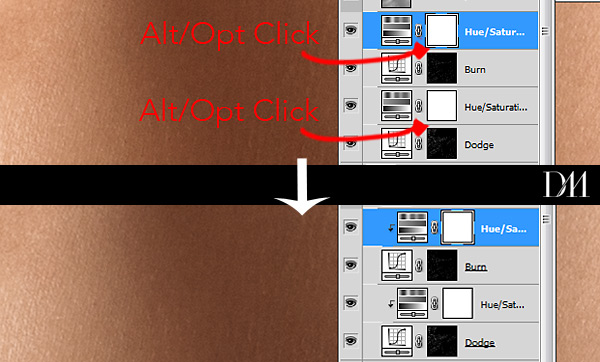
To remedy this open two new Hue/Sat adjustment layers, one above each of your Dodge and Burn curves;
Alt/Opt click between layers to clip a layer to the layer beneath. This means the effect of the clipped layer will only affect the appearance of the layer it’s clipped to. It will recognise masks, so clipping a Hue/Sat layer to your Dodge curve will affect only the dodged areas;

As we know that dark areas are likely to become (or rather remain) oversaturated when lightened, drop the saturation slider on your Burn adjustment. And as lighter areas are less saturated, and will remain so when darkened, raise the saturation slider for your Dodge adjustment. You can set the saturation slider according to how much of a shift you see in colour, frequently anywhere between no shift at all to plus or minus 20pts depending on the image. Zoom in and check closely while you choose your slider setting, and don’t forget you can adjust the hue in the same dialog if you find it necessary.
Please feel free to share the article, and if you have any questions please post them below.
Danny
Again, simple as ABC but crystal clear ! You do things for a reason and we get it !
Hello i really enjoy your work and was wondering do you offer classes or have dvd tutorials for sale..? or of any internships or additional help you may need.? Thank You-Chris Johnson 585.451.8400
Hi ,
i really Enjoyed this post it is wonderful information about retouch photos.Thank you..
Hey,
Thank you so much for your tutorials! They’re to the point, helpful, and honest. They’re gems, especially when one is tired of ‘quick fixes’ and is looking for the professional, high-end, non-destructive techniques.
I’ve recently broken away from the ‘frequency separation’ technique of separating one’s color and detail layer, as I found the skin to still look too ‘photoshopped.’ I felt it lacked control. That being said, without your color layer, how does one tackle uneven, blotchy skin tone, like overly red foreheads/cheeks, and smudgy make-up? With my old technique, I could simply blend the colours together using a clone stamp set to a low opacity and flow.
If possible, I would kill for a tutorial on how one might do so with less destructive methods and greater control 😀
Thanks again for sharing your knowledge!
Amy Dresser uses a wonderfully subtle technique for that: she makes a selection using the lasso with a large feather and she makes sure the selection is a very jaggered one and well within the area you wish to affect so as to allow the feather to blend the effect nicely. She then makes a curves layer with that selection and adjusts the curve for each channel by eye to match the surrounding area. She will build the effect up often going over the same area multiple times and repeating the process with different curves layers. Each adjustment does not seem like much but when you group them and turn them off the effect is dramatic. I use that together with the curves D&B method and it is wonderfully subtle.
I’ve just recently discovered the magical elements of D&B, this will make my photo edits SO much more effective. Thank you!!
Love this!
I’m sure a lot of us retouchers can really utilize this technique.
Thanks!
Hi Daniel,
While working with dodge & burn, I often face problems in selecting the pixel level. Seems like these tricks will help me a lot. Thanks a lot!!
In my case whatever I use D&B cuves or Micro D&B soft-light 50% grey or the burn and dodge tool on overlay layer it will considerably desaturate the shadows part I intend to remove to clean the image. Looking or a solution